proper form

  • How To Fix Bad Posture: My Favorite Secret Tool

    Bad Posture Corrector » From the Infinite Embers blog

    Got bad posture? Get this correcting brace.

    (Note: This post is NOT sponsored and is written out of genuine love. However, it does contain Amazon Affiliate links that support the blog!)

    Woo boy, I should have listened to my mother about sitting up straight. I’ve been on a mission to correct my bad posture for a while now, and this is my favorite tool that I’ve tried, by far.

    My bad posture began when I was a kid. For a long time though, I didn’t think it was that big of a deal, so I wasn’t conscious about it. Years of way-too-heavy backpacks and hours spent hunched over my keyboard writing eventually took their toll on my body and helped contribute to my chronic neck injury that began back in 2013. My traps and neck muscles all seized up, leaving me immobile and in so much pain I became obsessed with fixing myself.

    I still am, although I’m now very close to the finish line. It’s my goal to be completely pain-free by the end of 2019, so I’m getting serious about my recovery. Wish me luck!!

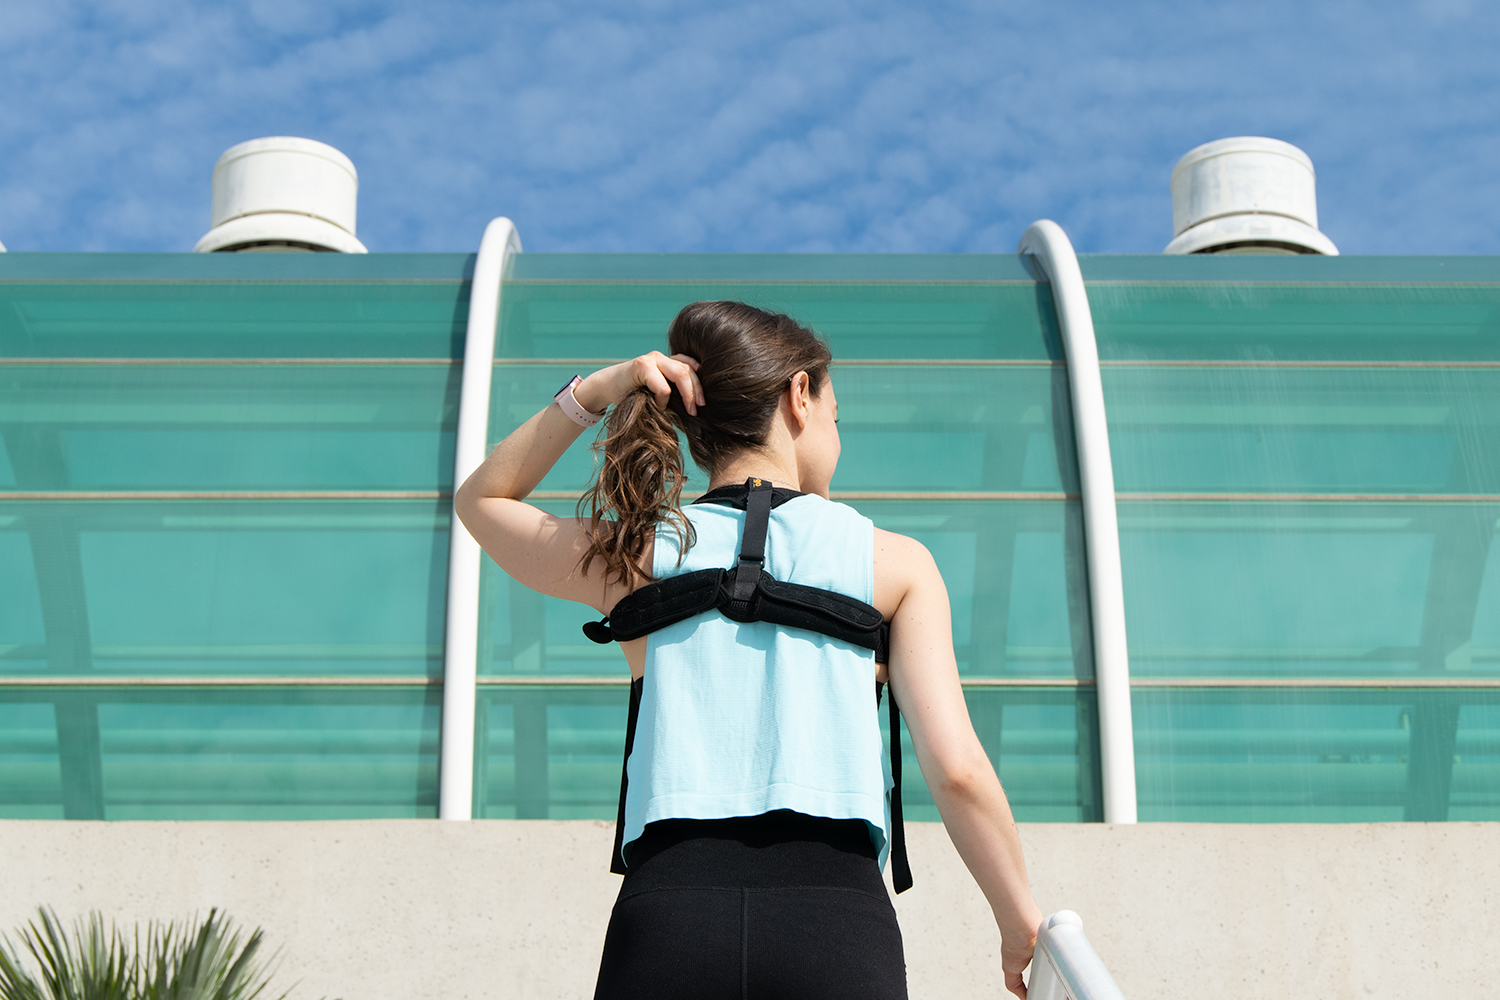
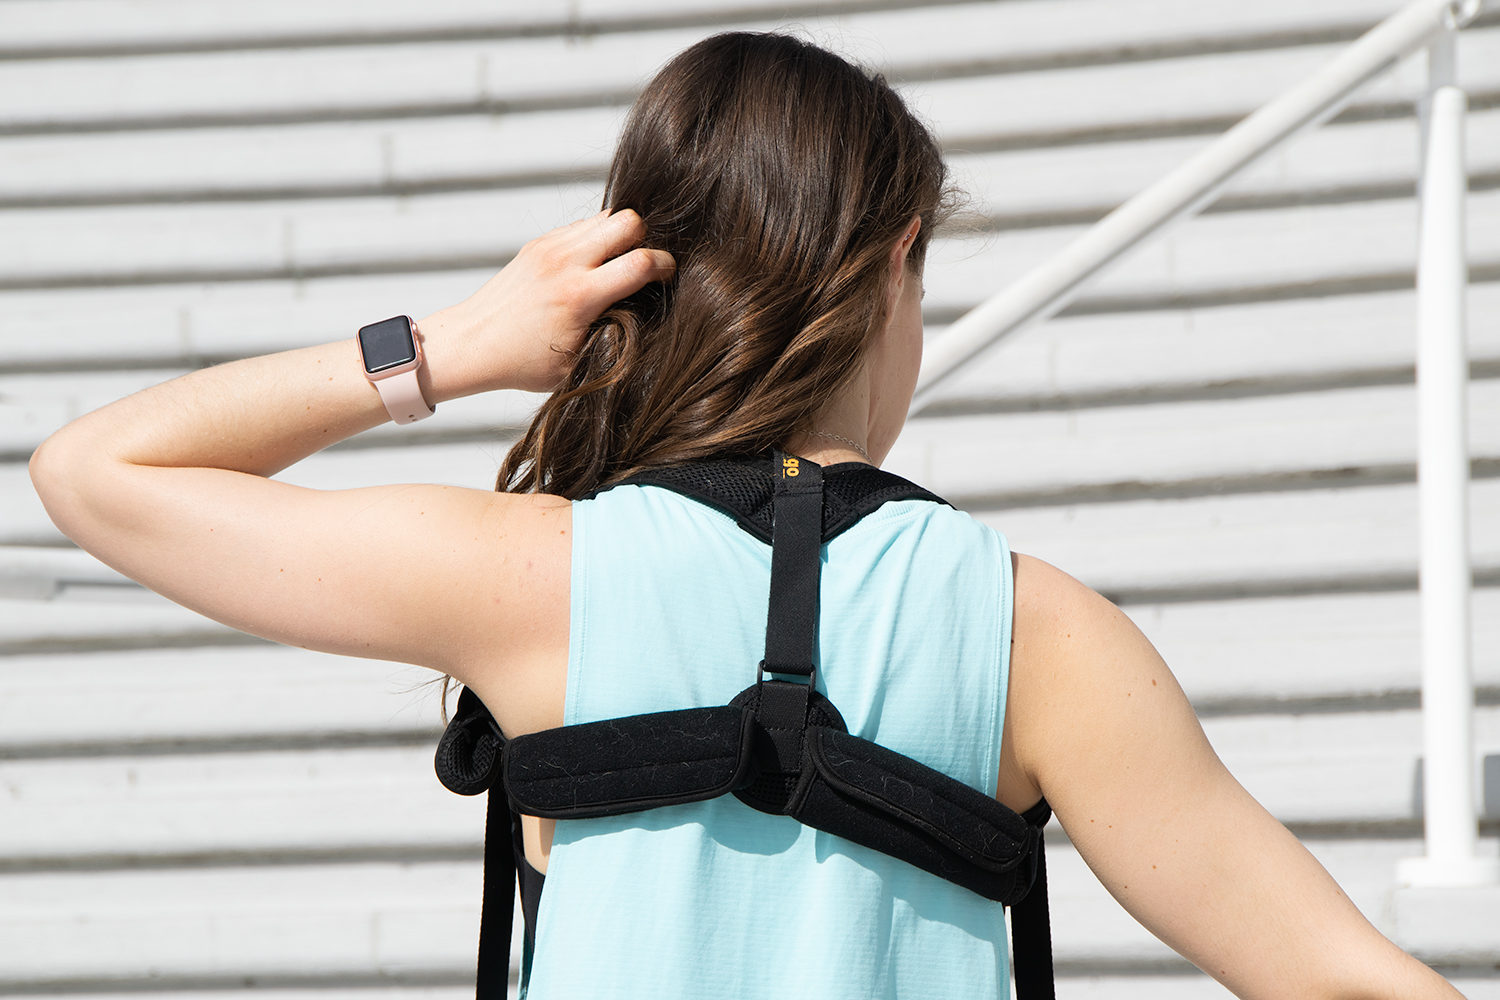
    This posture corrector has helped me SO much along the way.

    Bad Posture Corrector » From the Infinite Embers blog

    I also tried a Lumo Lift for almost a year to help remind me to sit up straight, and I liked it as well, but for me it wasn’t quite enough. Even if you’re standing upright, you can still have your shoulders forward and inwardly rotated (which I did). I needed something more effective.

    When you’re first starting out, it can be exhausting to stand up straight. I didn’t have the strength yet to hold myself upright on my own.

    I should mention that correcting bad posture isn’t going to happen instantly. We’re talking about how your body has trained to move and hold itself (which is largely unconscious) habitually over a long period of time. So you’re going to have to retrain your muscles and mind to a new way of standing, finally allowing yourself to take up space. It’s important to re-strengthen the back body and stretch open through your chest to move your body back into proper alignment, as well as strengthen your core, primarily the transverse abdominal muscle. A physical therapist, personal trainer, or other good body worker can help you with this journey—and so can this brace!

    Bad posture is becoming an epidemic. So many of us struggle with it, largely thanks to technology. We all know that looking down at our phones is bad for our necks, but we all crank our heads down anyway (guilty!). Then we spend hours sitting, which is terrible for our posture. It’s time to fight back and reclaim our bodies’ mobility!

    Bad Posture Corrector » From the Infinite Embers blog

    (Authentic talk: my dog Corgi the corgi‘s fur covers everything I own. Even when I try to clean up for a photo. As you can see if you zoom in on the brace. haha!)

    It’s important to correct bad posture for many reasons:

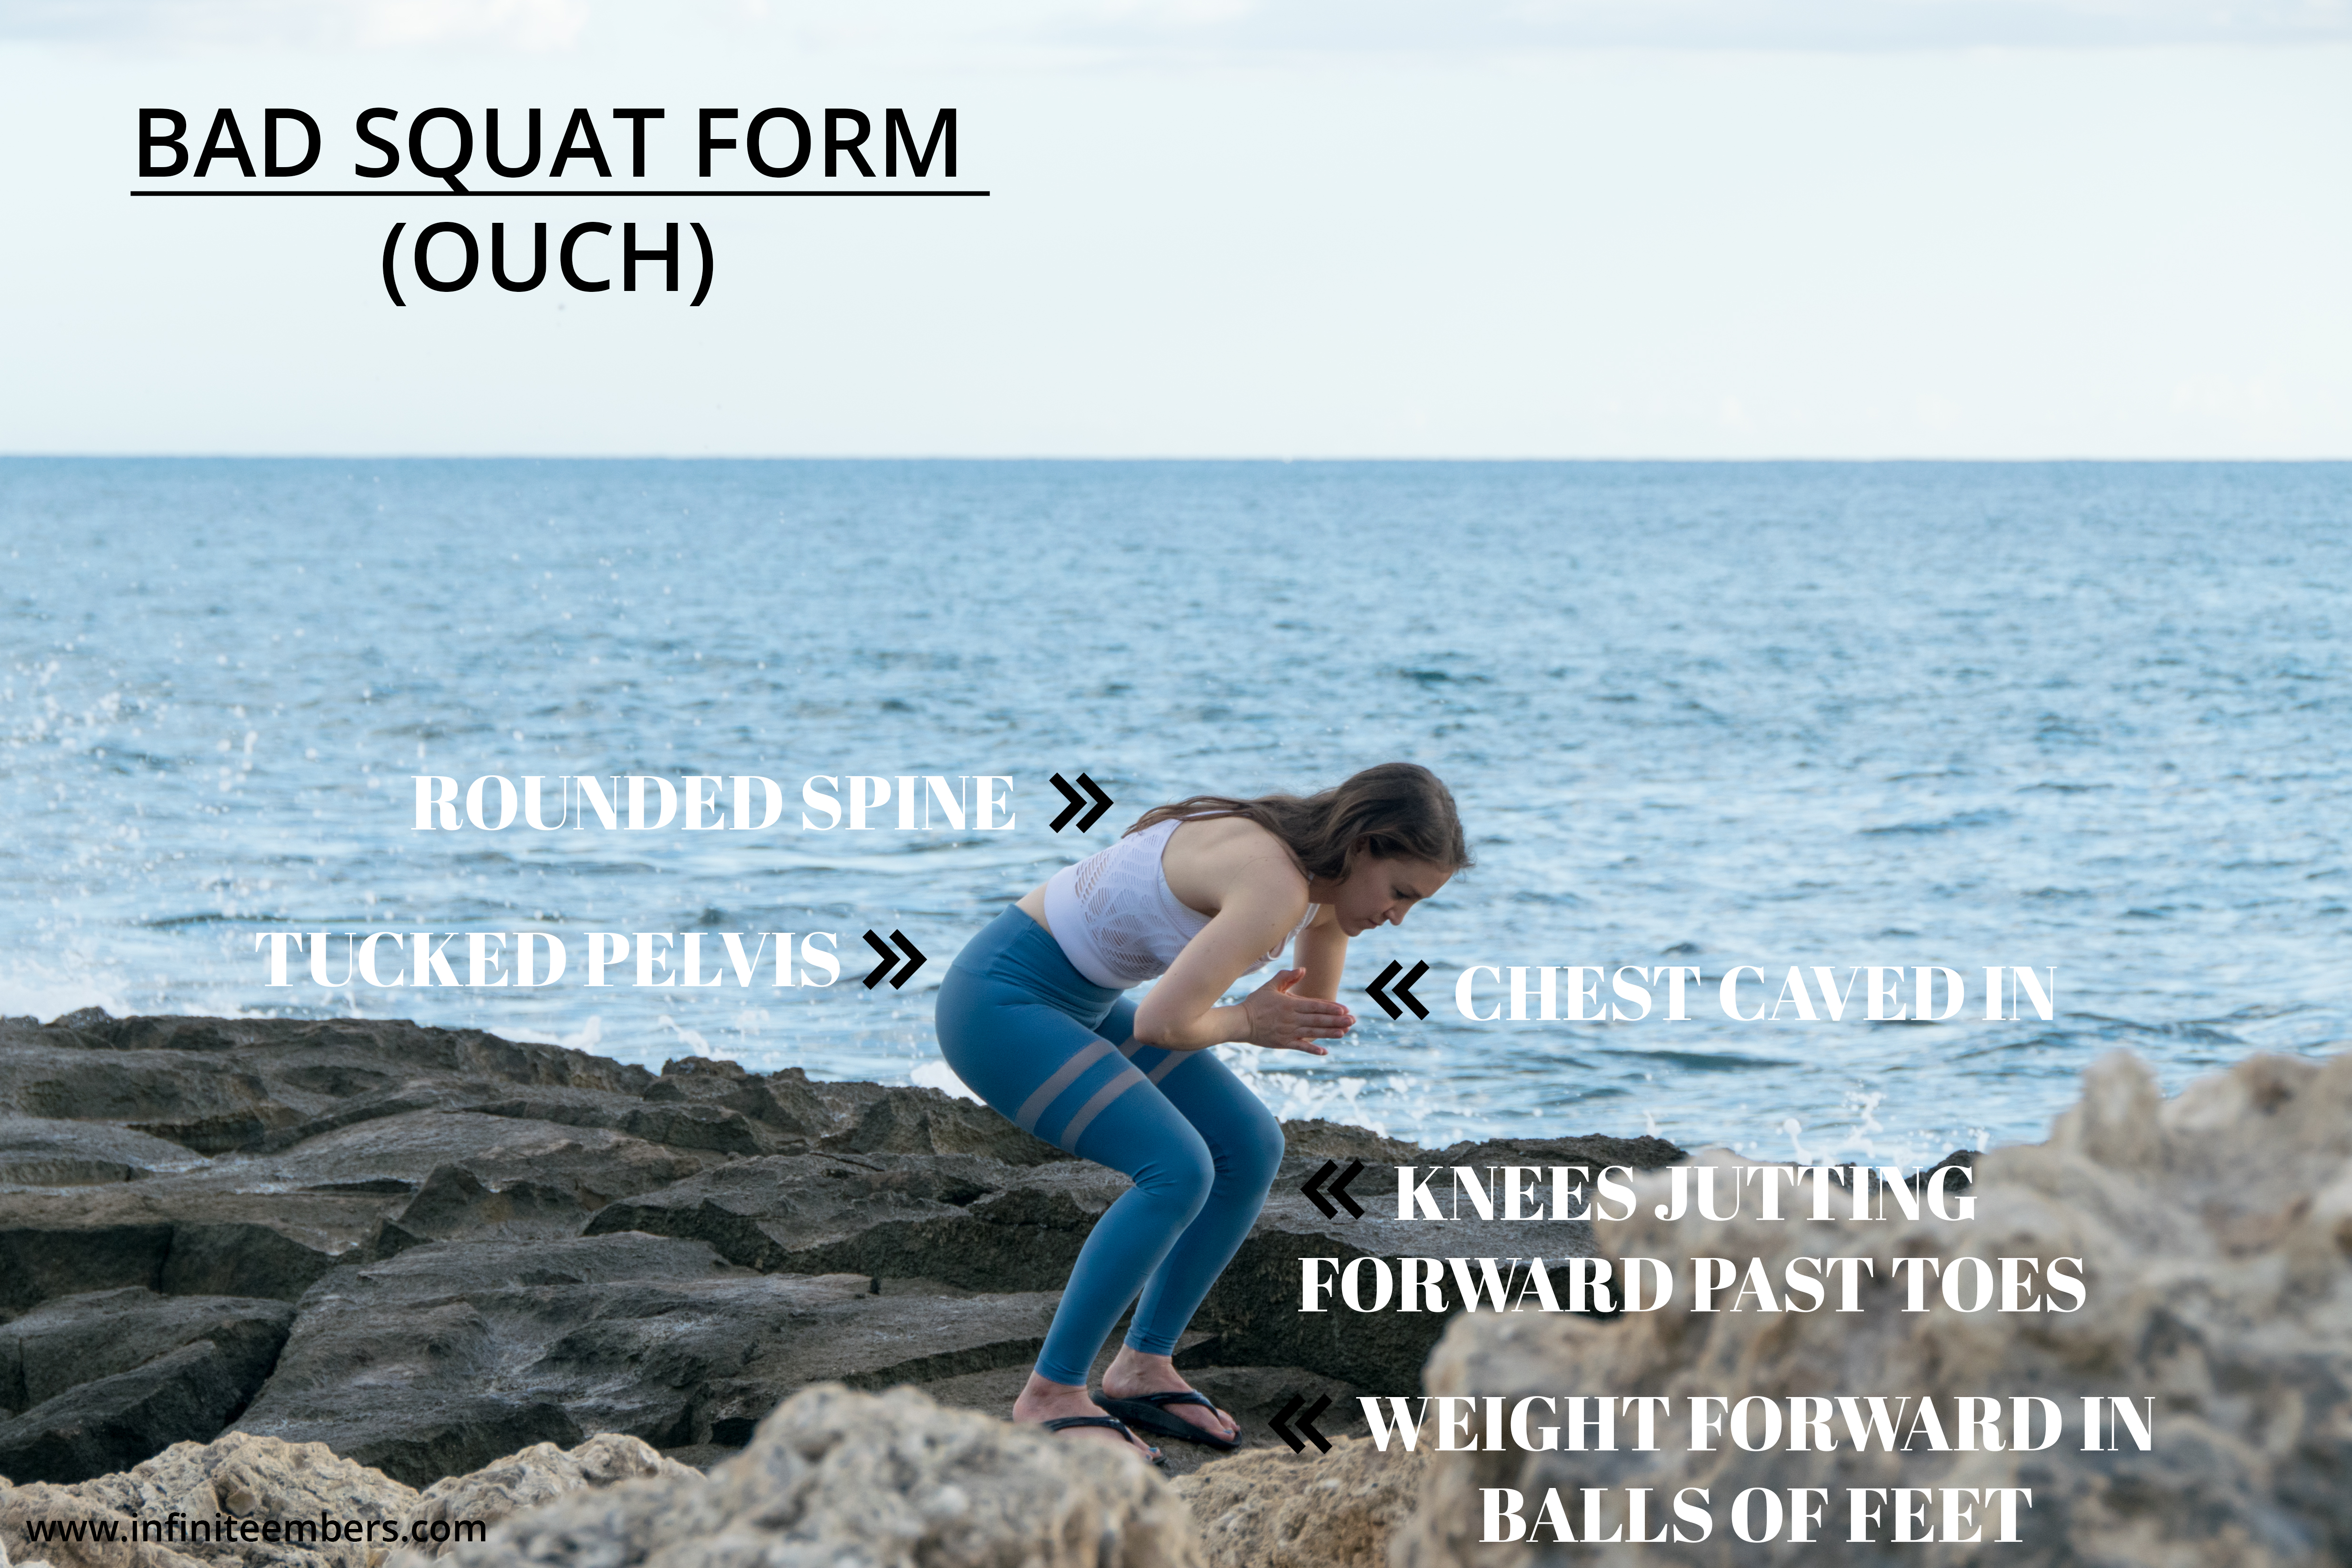
    • It can cause health problems anywhere along your spine. As the downward angle of the head increases, the pressure on the rest of your spine increases. This causes can build up to bulging disks, herniated disks, etc. No bueno. Also, it’s common to have headaches and neck tension just like yours truly.
    • It affects how well you can breathe. Your ribs need to be able to expand properly in all directions, like an umbrella, when you breathe. Bad posture is like cinching together part of that umbrella and restricting its range. Not being able to breathe fully can cause anxiety, insomnia, and muscle tension. This has been a major battle for me personally, reclaiming my full breath.
    • It conveys an image of low confidence. And interestingly, it can actually CAUSE low confidence! Your brain responds to how your body is positioning itself! (and vice versa, your body responds to your brain’s thoughts and emotions). This TED talk about power poses explains this connection and is also such a good watch. Confidence is good posture: standing up straight, held held high, making eye contact. The more you practice, the easier it gets, and the more confident you’ll become in turn.

    Bad Posture Corrector » From the Infinite Embers blog

    Why I love this Posture Corrector:

    • Because it works. The brace guides your shoulders back and down into place and serves as a gentle, reminding support that reminds you constantly to check back in with your posture.
    • It’s literally only $13, so for an effective health tool, that’s hard to beat.
    • They also offer a full 30 day money back guarantee, so it’s obviously worth trying.
    • It’s super simple to take on/off and adjust. The brace is unisex and fits chest sizes ranging from 28″ to 48″.
    • It’s comfortable! I feel instantly better when I’m wearing it, honestly. It becomes easier to hold myself in good posture, which takes the tension off my neck. The pads also help avoid chaffing/digging into your skin for a comfortable wear.

    I love this thing. I wear it most of the day if I can, especially for all the hours I spend at my computer (I also use a standing desk). In fact, I’m wearing it right now as I write this!

    I’ll admit that this posture corrector isn’t the most discreet—it’s best hidden under looser clothing. But I rock it around town just as-is, on top of my shirt, because who cares, right? My Sunshield draws far more attention, lol. I’d rather feel good than GAF, ya know?

    It’s important to note that it’s possible to over-correct your posture, so you don’t want to cinch the bands too tightly on your brace. You want your shoulder blades to be wide and down, not squeezed back together—think a straight line from shoulder to shoulder, intersecting your neck. Be mindful if you tend to hinge backwards at your shoulder blades and engage your core slightly by pretending someone’s about to punch you in the stomach. That should help you find balanced, perfect posture.

    Bad Posture Corrector » From the Infinite Embers blog

    As with anything in your body, fixing bad posture takes time! So be kind to yourself and stay committed—soon you’ll be standing up tall.

    » Song Vibes «

    (har har har)

    What are some other ways to correct bad posture? Share your tips with me in the Comments below!

    xo,

    Amy

  • You Need To Fix Your Spin Form

    You Need To Fix Your Spin Form » From the Infinite Embers blog

    » Top: Puppies Make Me Happy «

    Your spin form probably sucks.

    But it’s okay! Nearly everyone’s does. Mine sucked for a long time, too, before I became an instructor. Even though you’re trying your best and your instructor may (or may not) be giving excellent cues, it’s really challenging to focus on getting through a sprint while also thinking about your spin form.

    I mean, I would weep if I ever saw a photo of me in spin class way back when. When I took my first indoor cycling class way back in 2011, spin kicked my ass. And I know I took all my tension straight into my shoulders and was hunched over my handlebars like a tiny gorilla. Yikes.

    Whether you do indoor cycling or legit road cycling, having good form on your bike is KEY.

    When I teach (and I will be back to guest teach for a week at PURE Indoor Cycling the last week of Oct in San Diego!) I try to talk about form a lot. Like, I maybe talk about it too much. But it’s just the MOST IMPORTANT part of taking a spin class.

    If your spin form isn’t correct, the rest of your workout will be negatively affected as well. But when you have good form, you’ll find you get results a lot more quickly, which makes you stronger and can prevent injuries (bonus: you’ll also be in the best shape of your life, especially if you have a strength-training and stretching routine in addition to doing spin).

    Let’s break down proper spin form:

    You Need To Fix Your Spin Form » From the Infinite Embers blog

    Here’s what you should look like, scanning from the base of your body up to the top:

    1 » Feet are flat + working with equal force.

    As you pedal forward you want to feel your heels pressing down as you lower. Then, focus on pulling your knees up into your chest to bring your feet back up.

    Also, press equally into both feet. SO many people in rhythm-style classes develop a horrible habit of pressing down more forcefully with their right foot in order to stay on the beat. This means that as they ride they’re essentially galloping. This both looks funny AND can really cause a lot of problems because it twists and destabilizes the pelvis.

    I’m speaking from experience here! I developed some pain around my sacrum for a while before I figured out I was unevenly training my legs that way. So it KILLS ME when I see this.

    Seriously.

    I DIE INSIDE.

    Ideally in these classes we’d all alternate leading with both our right and left foot, but that’s unfortunately just not how most studios teach (it tends to create a disorganized uncoordinated mess). So, you must focus on pushing and pulling equally through both your right and left legs.

    And since we’re talking about your feet…

    One more thing – you want your feet to point straight ahead. Check your shoe’s clips to make sure they’re on straight and ask the staff at your gym or studio to adjust them if they’re crooked or tighten them if they’re loose. You don’t want to ride with your foot all twisted or unstable! Again — been there, done that, nursed the aching ankle for a week, etc.

    And, for the love of your arches, buy or rent spin shoes.

    Seriously. Don’t use sneakers in cages. Your feet will feel so much better, I promise. Find out what clips your studio or gym uses – you’ll probably need to buy either the Look Delta or SPD cleats.

    I highly recommend buying your own pair of cycling shoes even if your studio offers free shoe rentals. The shoe will be much sturdier and molded to your foot – and also sharing sweaty spin shoes with other people is just disgusting. I mean really. I worked at the front desk at a busy spin studio for a while before I began teaching and I would never, ever wear those shoes. But that’s just me.

    These are the Pearl Izumi shoes I use and I LOVE THEM.

    2 » When you’re on the downward stroke sitting in the saddle, your knee should be right above your ankle.

    You Need To Fix Your Spin Form » From the Infinite Embers blog

    It should look like this. You want to avoid your knee pushing forward over your toes as that puts a lot of strain on the knee.

    When you’re up out of the saddle, make sure your knees don’t go forward of your toes.

    This is often controlled by the set up of your bike, so if you’ve been measured correctly you should be good to go. I’ll go over how to set up your bike in a future post, but for now please ask your instructor or the desk staff at your gym or studio to help you if you’re ever not sure if you’re positioned correctly or don’t feel comfortable as you ride.

    3 » Your hips are pulled back.

    This will also affect #2 – if you start to bring your hips forward as you ride, your knees will likely start to jut forward of your toes. You want to always think of lining up your hips with the back of the saddle, whether you’re in or out.

    The real trick to nailing your spin form when you’re out of the saddle is to think of holding a squat.

    Do a little squat right now. Ok, great. That’s exactly what you want on the bike.

    Knees are over the centers of your feet, hips are back, and most importantly:

    4 » Your pelvis + spine remain in a neutral position.

    Think of standing with your absolute best posture. Now stay in the same position from the waist up, but hinge forward at the hips, just like a Barbie doll. Bend your knees. Boom. That’s a squat. And that should be you on a bike. From your tailbone to the top of your head, your back should be nice and long and aligned. Your chest and back should feel broad and relaxed.

    In order to keep a strong neutral spine while you spin, you have to engage your core.

    To engage your core, picture someone punching you in the stomach. Notice how you brace your abdominal muscles? Try to hold that for a beat every time you exhale to really use your abs during your ride. This makes spin a killer core workout (really! especially in out-of-the-saddle moves) and will help you get more power out of your pedal strokes.

    5 » Your shoulders are relaxed + neutral. Your head is up.

    Remember, everything is neutral — including your neck. Yeah, it’s hard to understand what to do without looking at the instructor, or maybe you just love watching yourself in the mirror (guilty, I admit it — I’m not even ashamed). But if that means you’re cranking your head up or twisting to one side, you could be setting yourself up for neck pain. So look wherever you must in order to keep your cervical spine happy and neutral, and maybe try closing your eyes.

    That’s one of the my favorite parts about spin – the fact that you can close your eyes and go internal while you do the workout. I’ve found it to be super meditative.

    6 » Your hands are light on the handlebars.

    You Need To Fix Your Spin Form » From the Infinite Embers blog

    When you ride out of the saddle, keep a relaxed, light grip on the handlebars. As soon as you start to clench with your hands, tension rides up your arms, into your shoulders and then into your back. Relax.

    If you’re pushing yourself to the point of holding a death grip, you might want to use that as a sign that you need to back off and rest a little. It should be a challenging workout, but never to the point where you start to tighten up muscles you’re not supposed to be working.

    When you’re in the saddle, push lightly with the palms of your hands into the handlebars. Recruit your abs to help take the weight off your hands. Keep your spine long and neutral and bend your elbows slightly. Don’t curl into yourself – you want to keep your chest open.

    » Pro Tip to Nail Your Spin Form: Before you spin, hold a plank for 1 minute, then do at least 15 squats!

    This helps you get warmed up AND feel all the necessary muscles engage before you get on the bike so they’re easier to tap into once you start your ride. I love to do this before I get on the bike and highly recommend trying it. Just get to the studio nice and early so you actually have room to throw a plank down somewhere.

    » Song Vibes «

    What not to do, haha.

    What’s one thing you can improve in your spin form? I still constantly remind myself to keep my upper body relaxed. It’s hard! Share your struggle with me in the Comments below.

    xo,
    Amy

    This post is not sponsored, but there are affiliate links throughout this post. I genuinely love these products and know you will, too. Thanks for supporting the blog!

    Photos by Matthew Hanley, edits by me

    SaveSaveSaveSave

  • How To Squat With Correct Form

    How To Do A Squat With Correct Form » From the Infinite Embers blog

    The squat is just always going to be one of my favorite workout moves.

    It’s so simple, yet majorly effective. Squat is also a word that if you think about too much starts to sound really weird. (You’re welcome)

    I make sure to throw in a round of squats at least 3 times a week when I train!

    Why squat?

    Squats are amazing because they’re a functional movement — that is, it’s a movement you do in real life. It’s rare that we’re lunging around our houses, but you know you gotta squat to lift up a heavy box.

    A squat is also a compound movement, meaning it involves two or more joints (hips and knees). It also recruits the majority of your muscles. We tend to think of squats just as a booty-building move (and it will help you build up that #peachbutt), but it involves not just your glutes but also all of your legs, core, hips, and back. Hold a weight in your hands while you do it and it might just work almost every muscle group in your body. Stronger muscles means improved physical health and decreased risk of injury — starting to get why I love squats yet?

    There are of course different variations of squats. For example, if I need to drop down to the ground for some reason (like to play with my dogs), I tend to prefer to hang out in malasana (which is a yoga squat that’s fairly deep), instead of sitting (it’s definitely strange). If you can rest in that position comfortably, it’s way better on your back than slumping cross-legged, even if it does look a little odd. In many countries around the world, especially in Asia, that’s just how they hang out. Walk around Bali and you’ll see lots of vendors chilling a couple feet off the ground. They know what’s up.

    (BTW — you should also be squatting to go the bathroom. But that’s for another post.)

    Today I want to talk about the basic bodyweight squat, since that’s the squat most of us know and love/hate.

    It’s a fitness move you’d think everyone would basically do correctly, but you’d be wrong, my friend.

    I have seen some jacked-up squats when I’ve taught them in my classes.

    So let’s go over correct squat form.

    Here’s the right way to do a standard bodyweight squat:

    How To Do A Squat With Correct Form » From the Infinite Embers blog

    • Stand with your feel slightly wider than hips’ distance and slightly turned outwards
    • Push down through your heels so your weight pulls backwards
    • Bend your knees as you pull your hips back and down
    • Keep your back long and in neutral (low back maintains natural curve)
    • Your pelvis should also stay in a neutral position (no tucking!)
    • Keep your chest broad
    • Engage your core
    • As you sink you hips down, only go as far as you can while maintaining your long neutral spine
    • Watch your knees and make sure they do not bend past your toes
    • Also focus on keeping your knees tracking over your 2nd and 3rd toes so they don’t cave in or bow out
    • Grip the floor evenly through all ten toes
    • The goal is to get your hip joint below your knee joint (this position is called “parallel”) — but work up this and only lower as far as you can while maintaining proper form
    • Squeeze your seat when you come back up to standing
    • Do at least 3 rounds of 15 sets
    • You can also up the intensity of your workout by holding your squat down as low as you can for as long as you can, then adding little pulses, moving your hips up and down 1″. Get ready for that booty burn!

    Now here’s what NOT to do:

    Avoid These Common Squat Form Mistakes » From the Infinite Embers blog

    I can’t even stand to look at this one. Like just looking at my back makes me want to scream.

    What’s funny is that I was posing in this horrible Gollum position for this photo when a couple walked by… they must have been so confused watching my husband taking photos of me like this. I like to think they assumed that I was attempting to do this squat as I tried to look super cool on Instagram with this beautiful Hawaiian view and that no one had the heart to tell me that I really sucked.

    This was actually the second round of photos we took showing the bad form, because in the first one I didn’t jut out my knees far enough for it to look wrong. It hurts to do! Guys! Why do you do it?!

    This picture is obviously overly exaggerated, but sadly I actually do see these mistakes quite often when I teach. Thankfully not often all at once though – it’s actually fairly difficult to try to squat this horribly!

    To recap, here’s what’s going wrong in this photo:

    • My spine is rounded forward – and my chest is caved in
    • I’m also hanging my head down so my neck is rounded forward, too
    • My hips are tucked under like a dog with a tail between its legs instead of in neutral
    • I’m not using my core at all
    • My knees are going way too far forward – past my toes!
    • They’re also caving in towards each other instead of staying in line with my feet
    • My weight is forward in the balls of my feet, not my heels
    • I also have my feet too close together and slightly turned in

    And now a video to bring it all together:


    Here I talk through and demonstrate how to do a squat correctly — it’s nice and quick for whenever you need an easy refresher!

    One final note:

    I usually do squats barefoot, but this coral happened to be a bit too sharp for my feet, so flip-flops it was! (They’re Oofos, which are incredibly comfortable and super supportive — here’s a link if you want to buy some! That’s an affiliate link and will help support the blog. I wear these flip-flops every single day and LOVE them.)

    When you do squats barefoot instead of in shoes, it helps you get better grip with your toes and strengthens the muscles in your feet. If you want a way to give them a little TLC after your barefoot workout, I recommend stretching your feet out.

    Do you love doing squats, too? Or is more of a love/hate thing? What do you struggle with the most when doing them? Share your thoughts with me in the Comments!

    xo,

    Amy